Please remember that any photos, images or text on this blog remain my property, but if you wish to use any that you see, feel free to contact me for permission. Thank you for respecting my request and enjoy your visit.......Joy

Showing posts with label quilts. Show all posts

Thursday, January 14, 2016

Allietare Step 5 - nearly there...

After a scorcher of a day here yesterday (41C) and with the air con on full blast, I have finished sewing Step 5 and nearly all of the 'finale' or reveal and final step.  Hoorah!!  This is one quilt I have enjoyed working on.  Everything just seemed to go right and I love the choice of materials I am using.

Typical of Bonnie is her way of keeping things very very secret until you get to the final clues and the 'reveal'.  There are actually only two (different) blocks in this entire quilt, plus it is set on point.  AND would you believe the setting triangles are 'pieced'.  First time for this, for me that is.

So, after a mammoth sewing day today, I have now completed all the blocks, setting triangles and am ready to lay them out tonight.......


Remember that pile of 2" finished HST's from Step 1 and the 2" black squares - here they are - all joined into a 4-patch.


AND they are also here as the corner blocks in these squares - joined with the red and white trapezoids. All ready on my design wall to be sewn together.  Please no comments on the one that has one of its components upside down.....

I promise I won't sew it this way...

But wait there's more of these little devils to come......


Four of the above blocks sewn and pressed.  Loving the secondary pattern in the middle.... but we have to wait and see how they are used in the quilt.


This block uses the yellow/neutral 4-patches, plus the red/black bow-tie type block.  They also look good together on the wall.


Of course, a close-up of two finished blocks -


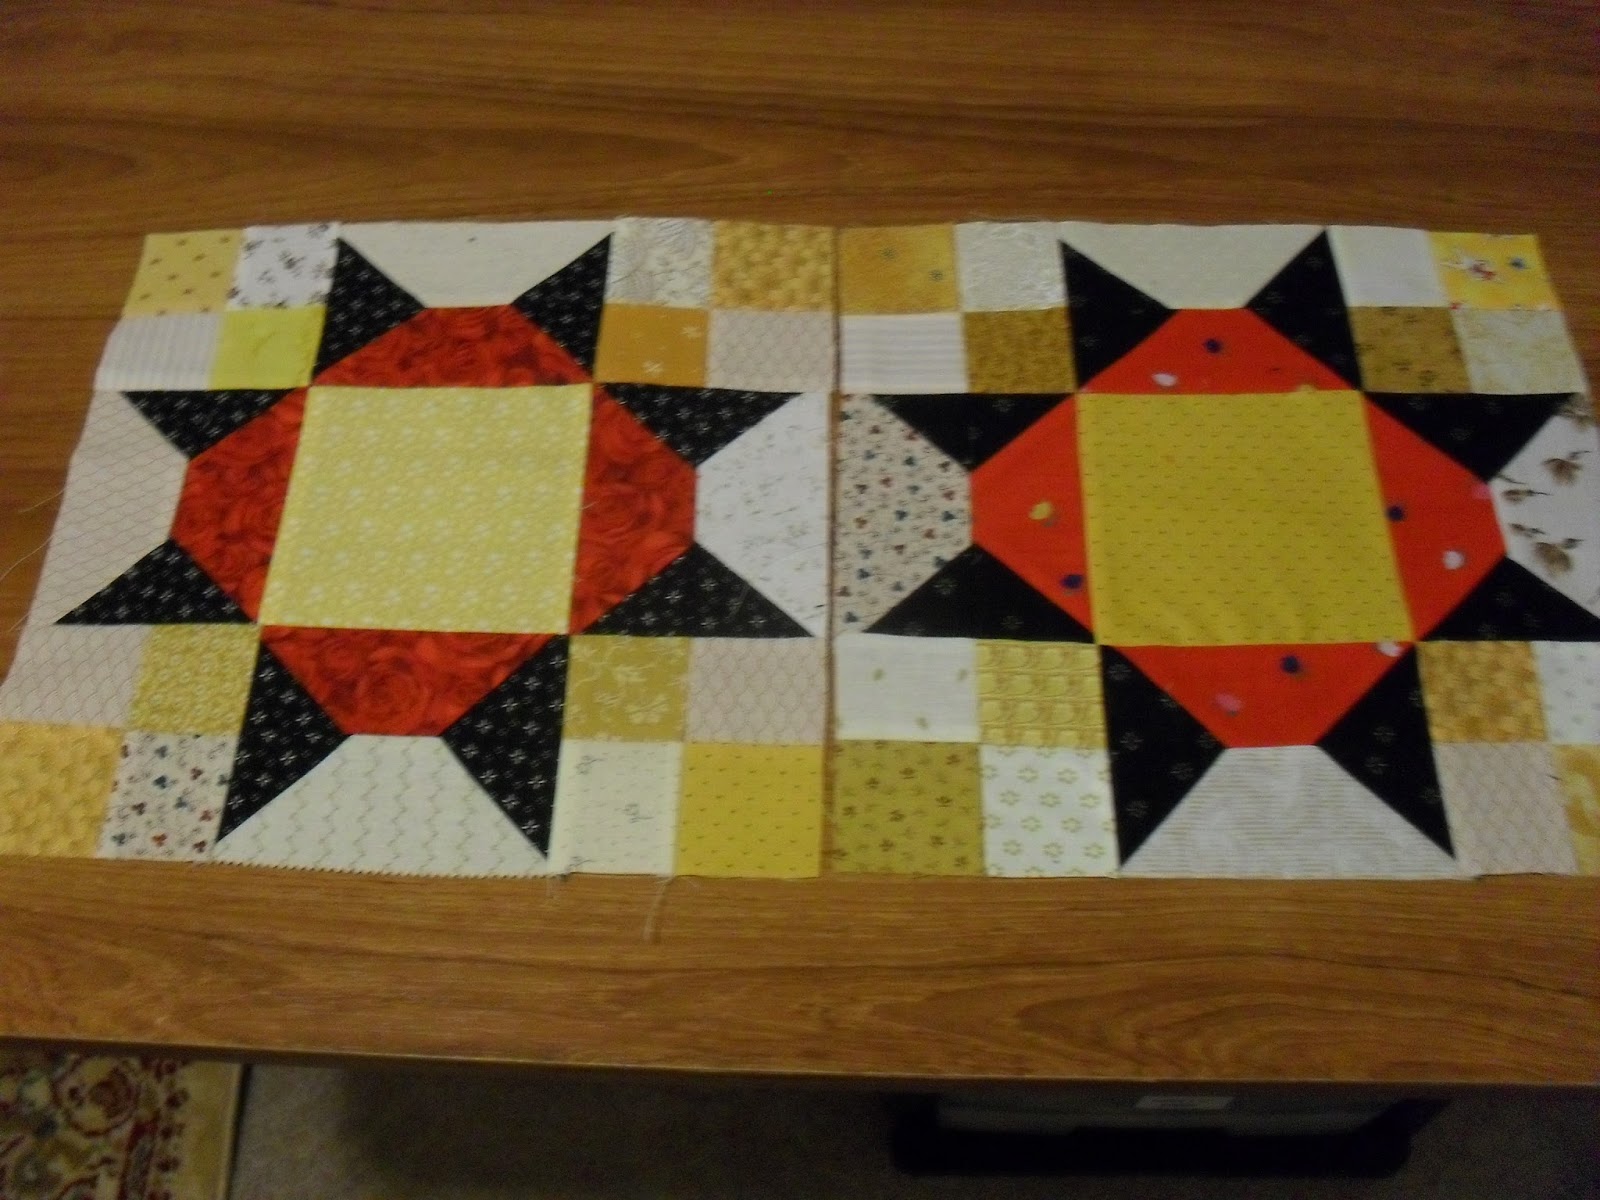
The final lot of those pesky triangles are used with those long neutral strips with a triangle in the corner, together with a red triangle for the 'setting triangles'.  (Note 3 triangles to make one...LOL)


The blocks are set alternately on-point.  After laying them out on my floor I can start sewing them together.

Then, I can have my 'reveal', hopefully this weekend.

Saturday, December 26, 2015

The 'Grey' Quilt was well received.....

I hope you all had a lovely Christmas with family and friends.  I didn't have the time to post before Christmas as I was busy trying to get this 'grey' quilt finished in time for Christmas Day.

Plus in the couple of weeks before Christmas I had the cataract in my left eye removed and even though my sight has greatly improved, putting the required drops in 4 times a day my eye was constantly blurry.

Well, at long last here it is - the "I only want grey thanks Mum"....  The photos shows it on the floor - I don't have a wall big enough to hang it. It turned out to be nearly a king size quilt, so even two sons over 6" couldn't hold it up properly without it dipping in the middle.
You can see how I quilted the flying geese by looking at the right hand side - that shows the quilting of the geese on the back.  It is reversable using a darker grey on the back, but the geese are the same - black, medium grey and very light grey.


The second photo shows the label on the 'dark' side.  I deliberately put it on the left side of the quilt so that if Warwick wants to use this side on his bed then the label would be on the side away from the door and not noticeable.

Personally I actually prefer the darker side. But unfortunately forgot to photograph that side - maybe later (if I get the chance to take it to Guild next month).


This last one shows the quilting.  I quilted in a 'grid' style resembling a tartan pattern.  He was very pleased to see I hadn't (in his words) "done my thing with the quilting"......

Sunday, November 15, 2015

Grey.....and grey....

Do you remember when........DS3 asked me if I would make him a quilt for his bed - naturally I said yes, what would you like.  He replied just blue and white squares, thanks mum and none of that fancy stuff on the top?

Well that quilt which you can read about here has been used and used and is now relegated to the spare room.

So....he has asked me if I would make him another.  Yes, I said.   When I asked what he would like this time the reply was 'just plain grey' thanks mum.  I suggested he buy two plain grey flat sheets and I would join them and he could put his doona in it!!!  "Oh, I really would love a quilt if that's OK."     Plain grey???  I then asked him to send me some photos or clippings from mags showing what he liked and I would work from that.  (ps he loves Ikea...)

Among some of the stuff he sent me he said he liked the one with a couple of 'arrows' on it. OK, says me - I will have a look and found the one with the 'arrows' - plain pale grey doona cover with - yes - 'flying geese' at the bottom!!!

Decision made - material brought and here is a little snippet -


Just to make this a little bit more interesting with a much nicer photo I have been busy sewing more hexagons into my 'hexagon star' quilt.  I love the way this is looking, still not sure how big I will go - probably not much more than this.  With the extra bits that need to make it square I think will be enough. It will finish at around 5' square.  I am itching to start a '60 deg' diamond next - The seven sisters' pattern.


Sunday, July 19, 2015

Doesn't time fly by when you are busy...

I've just realised it is the middle of July and I haven't posted in a while.  Life has been busy around here.  To start with I had some problems with my laptop - had that fixed. Had a rush job to finish off the red and white quilt that I have been showing little bits of - the baby was born a tad early, naughty little thing.  But of course she is beautiful.  No photos yet, but I do have one of the quilt.

Then I had to get my stuff together for a full week away at the Fibre Arts Australia Winter School.  Yes, a full week with lots of fun, good food, 100+ other mad artists and not one axe murderer among them!!! Came home with (I think) a beautiful piece of work; tired; then two days to get myself together and off again to Melbourne for some quality baby sitting time while DS1 and DIL took off for a few days together.

AND then the big week just gone - my "0" birthday (pssst quietly 70) last week which was started on Sunday with the grandees and finished yesterday (Saturday) with lunch with the family at a lovely restaurant in Southgate on the Yarra River in Melbourne.

I won't make this a big posting - will try and break everything up in its right category.

So, without further ado here is the finished Red and White quilt - It is made from an alphabet panel in pinks and I added the extra red and white bits to brighten it up

Monday, April 13, 2015

A little extra clue and why I haven't been blogging

I have been away from Blogland and the computer for most of the past month due to an operation on my left eye.  I wasn't able to drive for a couple of weeks and only minimum use of computer.  No sewing, or very little, not much tv - I was nearly climbing the walls. What does one do - no driving, no tv, no sewing, no reading.  All that is left is walking, eating and sleeping.  Anyway all is OK now.

The last couple of days I have been back at the sewing machine and have been working on my red/white quilt.  The one I showed you a teaser of in my last post.  Here is a little bit more for you to ponder -

You should be able to have a reasonably good guess at it now.  Presently I'm in the middle of pinning it prior to quilting.  Hopefully will have a finished photo in the new few days.

Sunday, March 8, 2015

A little teaser for you.........?????

Over this long weekend in Victoria (Labour Day - which is the celebration of the 40 hour week - see here for a link to how it started Australia) I have been doing a bit of cutting and sewing....as one does...

Thought you might like to see what I have been doing - you will have to wait until it is finished as I don't want the recipient to see it beforehand.  Surprise!!!  I love the colours....


Till next time,  bye for now.... Joy V.

Thursday, February 19, 2015

Finally I have a quilt top.

At long last, after much thought and umming and aahing, I have finally put together my blocks for Grand Illusion. For those of you who were wondering what I was going to do with the larger green/neutral 4-patch blocks - well I did use them.

As you can see from here I put them in the centre of the main block and then cut down a number of them and used these as the cornerstone blocks in the sashing.


These are the blocks up on my design wall (without any sashing).
It looks quite different from the original that Bonnie Hunter designed, but I am happy with it.  Although I do have a lot of blocks left over - but these will not be wasted - they will be sewn together, somewhat a little different again and given to my local Monday night group - Regent St Stitchers - for their charity quilts that go the local hospital.  I think the bright clear colours of the quilt will be loved by one of the older children.


And here we have the top with the sashing - as you can see the green/neutral as the corner stones.  I chose the same blue as in the blocks - had plenty of that particular piece of material.  Then I put a dark mottled grey as the framing border.  Not sure if I want to go further - I think it needs more borders, perhaps a wider one.  What do you all think?  I don't have quite enough of the green/neutral blocks,but could still make more., or I could add some of the other blocks that have been left out as I haven't made it as big.  That is the corner blocks with the yellow/dark blue - there could be enough to go around.  If not I will make some more.

Monday, September 29, 2014

It's nearly October already....

Time does fly.........

October is only a few days away and  I've realised I haven't posted anything since August....Dear me, I have been slack...

Do you ever feel you have lost your mojo for a while?  I did, but hopefully all is coming back gradually.


I finished sewing the top of my 'Blue Rhapsody' quilt - you know the one with all those blue and brown hexagons and now have it tacked ready for quilting.

My apologies for the clarity of the photo but the sun was shining right in the window and I didn't realise it till posting the photo.  The quilt is now at the machine and I have started quilting it.


I have also been very busy with hand sewing.  After all the years sitting at my machine I am really loving hand sewing and of course hexagons. (What else...)

This quilt started off being a copy of Martha Washington's Flower Garden in which all the flowers are shaped as diamonds, not the traditional flower shapes.


After sewing quite a few of these together - see some of my previous posts labelled 'hexagons' - I was playing around with them (as one does...) and I really liked what I saw when the diamonds were placed into a star pattern with a 'flower' in the middle.


This is now what I have decided to do with these diamond hexagons. Here are two that I have finished sewing.  What do you think?


Tuesday, August 19, 2014

Lots of work done at Retreat...

Not very much from myself but a lot of others were in the sewing mode!!!

This first one was made by Heather - Aussie animals foundation pieced from a book by Margaret Rolfe.


This quilt is a hand-pieced project from Annie

Judy's motor bike quilt for her father.

Partially pieced quilt by Lisa, from a Birthday Block exchange at Regent St quilts.

And this last photo is not a quilt as you can see, but beautifully painted sneakers that Jeann worked on. We all wanted a pair....Beautiful work Jeann.
I worked on my blue and brown hexagons and nearly finished appliqueing them onto the borders.  As soon a I have finished, hopefully this week, I will post a pic for you.

I hope you all enjoyed these photos - there were heaps more but as the lighting in the room at the time of Show and Tell was not the best some didn't come out as clear as I would have liked.  But a great weekend and looking forward to next year.

Monday, April 1, 2013

A finish and a WIP

Working through my collection of Japanese fabrics I discovered quite a few 3" squares, and wanting something to do which didn't stretch my brain too much, sewed them into squares and then sashed and bordered them with a navy blue.  I tried black but it was a tad harsh.
 Still had a lot of squares left, so decided to cut them in half and make a 'Japanese Coin' quilt. Had enough of the blue to sash in between the rows, but not enough for a border, thankfully, as I didn't want to same look.  Now I have to decide what to do for borders - will probably keep it on my design wall for the time being and audition different types as I decide what is the best.  Apologies for the shadow on the photo but I use the wall just outside the room where I sew and have to take a photo looking from side.
Still have heaps of fabric left, plenty of Fat 1/4s and half yards.  As it's not my style or choice now thinking EBay may be a good option.

Friday, November 2, 2012

Another finish and some more bits & pieces

Another long term UFO is finished!  The pattern for this quilt was originally bought as a BOM (pattern and buttons only) - I didn't particularly like the materials that were included in the full kit and also I wasn't keen on the setting and I wanted to use some of my stash.

The blocks are all different sizes and are embroidered.  I lightly coloured parts of each block to give the overall effect I wanted to achieve - I used Derwent Water Pencils that my son had used for school (15 years ago) which I found when doing a clean out!

After quilting the buttons were then added.

Here is a close-up of some of the beautiful buttons.

 My Monday night group Regent St Stitchers are having a 'Birthday Block' activity, this year we are starting with November.  We all make the same block, but with the colours for the recipient for the particular month.  Unfortunately, mine is not until July next year, but these four below are for the November and a couple of December birthdays. We get to choose a light and a dark - when my time comes I have chosen white-on-white and for the dark different reds.

Tuesday, October 2, 2012

He wanted squares.......

He got squares, sort of.....

Some time ago when talking to DS3 Warwick, he asked if he could have another quilt.  The first one which was a Marti Michell sampler in strong country colours, unfortunately/fortunately went with his ex wife when the marriage was dissolved.  At first I was a little bit miffed, but on the other hand she always liked the quilt and I know it will be looked after.

This one Waz said could it be just 'plain blue and squares'.  Well, how does a quilter make something plain and just squares without looking dull and 'plain'?  After giving this a lot of thought I searched through my stash and found a variety of blues with a fair amount of white quilters muslin.  I told him it would have to be a variety of blues and to look and choose which ones he would like me to use.  There were some beautiful aqua's and violet, but they got tossed!!!  Just plain blue please Mum and not small itty bitty bits.........or that fancy stitching.....

OK.  Thinking cap on - what if I did 9 patch (3" blocks) using the navy blue as the centre blocks and a medium blue in the middle of the outside blocks with the remaining blues alternating with the white on the corners.  Looked good after a trial couple of blocks.  BUT when I had made all the blocks, they just didn't go together when on my design wall.  I should have alternated the white in the middle blocks, but I wasn't going to unpick.  Then a light went off - as they were quite large blocks 9" square - what if again??? I sliced them and turned them into a disappearing 9 patch?  It worked - he still got his squares and plain blues, but I like the effect of how a disappearing 9-patch turned out with a minimum number of colours and those being plain.

There's movement together with a symmetry of a pattern and not just blocks in a row.

I used a varigated blue/grey/white thread to quilt with and cross-hatched through the blocks.

Outcome - he loves it. 

Moral - don't ask a quilter to make something 'plain', it can't be done.

Friday, March 2, 2012

I can now show you Travis' quilt

As you can see Travis is a Bombers fan.  It is a wall hanging made with a variety of reds/red & black 9" squares.  There are a couple of 9 patch squares in there to add a bit of interest to a rather bland design.  The 'bomber' emblem I appliqued onto a piece of plain black fabric and did a close satin stitch around each element.  He loves it.

Friday, December 9, 2011

Link for lovers of the history of quilting

Doing some surfing the other day (as one does when one should be sewing!!!) and came across this fantastic site - The Quilt Index.  It's a resource and reference tool that gleans its information from very large and varied resources, such as museums, private collections, etc. The information on this site is mind-boggling.  They have a blog also and you can read it here. When checking out the blog scroll down to a posting on 1 Dec 2011 and have a look at the Embroidered Quilt by The Ilingelihle Women’s Project, in South Africa. Absolutely stunning.

Some of the quilts on this site are not old, but are significant in that they are reflective in their interpretation of life in different counties and societies today.

I will definitely be checking this site regularly.

Sunday, July 3, 2011

More historical stuff

 I'm still going through my old photos of quilts that I have made in the past.

This first one is a small Baltimore quilt (the squares are 6" square).  I made this in a class at The German Quilthouse in Geelong, Vic (unfortunately it has been closed for some time now).

A pity you can't see the dimensional work, but there is a ruched flower, padded little rose buds, and free-form flowers used in the borders.

The whole quilt measures 36" x 36".

The next quilt (as you can see) is a kid's quilt.  I made it for my boss when his son Benjamin was born 6 years ago. 

I used pre-printed alphabet squares and stitched the animals, then added different size pieces of bright materials to the squares to add interest.


This last one is very special.  It is a signature quilt of my son's wedding.  I first did the applique and stitching and then we got the guests at the wedding to sign it.  It is finished to fit their dining table as a runner.

Hope you are enjoying my reminiscing as much as I am.


Monday, June 13, 2011

Hello

As mentioned in my previous post way back in April, I have been busy with family stuff. Hopefully I think it has all been resolved, except that I now have DS3 (Warwick) living back home - not just his 'stuff' but him as well.  Having spread myself out over the past few years in my little house, I now have to 'compact' a lot of stuff (that word again!!).  But this exercise has been good in one way - I have had to make strong decisions about what is really worth keeping and what is not. 

At the same time I have found some photos of stuff I have made over the years and given away as gifts etc.

Decided to scan these onto the computer so they wont get lost in the future.  Here are some - the first one is an old photo of me and my very first quilt, a scrappy pyramid.

The second one a basket wallhanging.
And the third is a sampler made in country style colours and material.  The original pattern came from Marti Michell.

I'm also learning to navigate myself around the new look Blogger. 

So much has changed since I last posted.

Oops, I've forgotten to change the aspect of the last photo.  You will have to turn your head to look at it properly...sorry about that.

Saturday, February 5, 2011

Another PhD completed

Would you believe this quilt was first started in 2002 with a block exchange between our little Tuesday night group of eight girls.  When we did this exchange we had only been quilting for a couple of months, so everyone was a beginner.  The idea of the exchange was to learn new techniques - each month one of us chose a block that we liked and gave out instructions for making the block with some suggestions of colour etc.  Most were pieced, but I chose an applique as I particularly wanted to learn this technique.  The cups/mugs symbolised our many cups of coffee/tea that was consumed while we had our little gatherings.

It was a few years later I came across the patterns for the teapots in the first round of corners and the coffee mugs in the final round corners and also incorporated the words.  Unfortunately, they are a tad bit hard to read in the photo because of the light thread I used.  But they say:

"If you are cold tea will warm you,
If you are hot it will cool you,
If you are depressed it will cheer you,
If you are excited it will calm you."

Now onto my next PhD (Project half done)....

Friday, November 12, 2010

Another one past the finishing line!!

At long last I've just managed to finish another UFO.  This rather large (Queen size+) is for DS1 and DIL.  I called it 'Bali Seas' - you have probably guessed it is made entirely from Bali Batiks and I have used mainly blues, with a touch of 'sea-greens' and darker 'reedy greens' to represent, naturally the ocean.  Both Cam and Sam love the sea and Bali.
The squares measure 10" and there is 10x12 squares.  Because of the size and also the design I decided not to put on a border, but did a wider binding.  The quilting itself is fairly simple as I didn't want to take away from the materials and pattern, so have crossed-hatched each square and then stitched ovals on the outside edge of each square and also I needed to be able to put it under my domestic machine.  With much folding and refolding I managed to do it.

Monday, May 24, 2010

A UFO hits the dust!!!

Well, am I pleased with myself this weekend.  One UFO completed (or I really should say 2 UFOs, but I don't count the second - why - because I have had a piece of white damask for quite some time - years actually! - that I wanted to hem and use as a table cloth for special occasions(?).  Hence no photo - only a white table cloth.

Now for the one that is counted and completed - a small quilt that I will use as the centre piece on my dining table.  This one started off as a 'something to do while on tour last year' - Michelle Marvig who was one of our tour guides gave us all two small projects to do.  One was a small square of fabric with a drawn pattern and some varigated threads to do a stitchery.  At our 'farewell dinner' on the last night of the tour she had divided the finished squares into 2 parcels and drew out a couple of names - one was mine - I got my stitching back plus 5 others.

I ummed and aahed for a while about what to do with these squares - put in as part of a large quilt, do a small quilt, make a wall hanging.  You know the drill - whill this work? or that?  In the end it was the colours
of the thread that made it easy to choose.

They were in autumn shades and as my house has lots of those colours and my dining table is bare, except for a vase that I like to keep there - the penny dropped - why not make a centre piece for the table.  Another easy choice was the fabrics - have a lot of those colours.  This is the end result - I like it.  Nothing fancy or over the top, very traditional - which I like also.

I hope the girls whose names are one the squares like it too.

Now to get back to the rest of my UFO's, including the other project we had on the tour - a small hexagon pincushion.

Sunday, May 16, 2010

Hand Sewing - long term project

Yesterday I went to the Geelong Quilting Guild's Annual Quilt-In.  A great day with over 200 people there and some even came down from Melbourne by bus.  I'm not a member of the guild, but hope to join very soon.

Of course when one goes to something like this you have to take some hand sewing with you.  I have been working on a stitchery quilt for some time now, but was getting a tad tired of working the stitcheries - don't get me wrong - I love the embroideries just wanting to do something else.

This is one of those hand sewn quilts that I have wanted to do for some time now.  Not sure what the pattern is actually called - I have seen it as 'Japanese Daisies' and a few other names.  Anyway, a very simple, yet striking quilt and one that you can take-along with you to meetings;  waiting in Dr's rooms; etc etc.

The basic steps are you start with squares of fabric - I am using Japanese type fabrics (atfer all I did say I have known it as Japanese Daisies!!); then the same size squares of batting; (I am using 3" squares) and finally circles cut larger than the squares.  To make it easier I am using an old CD disc for the template.  You gather around the edge of the circles and draw the thread in which you then iron down.
You place a square of fabric on top of a square of batting, then place this on the underside of the gathered and pressed circle.  Then one by one you fold over the edges of the circle and can either slip-stitch down, blanket stitch it down, or as I am doing use a contrasting thread (mine is gold) and quilt it down. 
Once all the squares are sewn you then join them together with a slip stitch - the same as when you sew hexagons together.  And finally the quilt is done - already backed and quilted - no edging needed.
Not sure how long this will take me - I'm not worried, but will post my progress from time to time.