Please remember that any photos, images or text on this blog remain my property, but if you wish to use any that you see, feel free to contact me for permission. Thank you for respecting my request and enjoy your visit.......Joy

Showing posts with label art quilts. Show all posts

Monday, February 8, 2016

Circles/Rings, whatever you like to call them...

Some time last year I attended a workshop with Brenda Gael Smith (Serendipity Patchwork), a well known and award winning quilt artist.  The class was on template free cutting and sewing.

I was slightly nervous about this template free cutting thing - I like to be precise in what I am working on.  Brenda gave out her instructions with a practice pattern and material to go with it.  As I wasn't using my own material I thought - give it a go - no harm lost, no material wasted....

When we were finished with our practice blocks Brenda put them all up on a design wall - and guess what - they looked fabulous.  Everyone had slightly different material and we all cut our blocks differently yet they looked great when put together.

After a cuppa and some morning tea it was down to work.  We cut and cut and then worked with our background blocks and started to arrange our circles. I only had time to complete (but not sew down) about 6 blocks.  This last couple of days while sitting with my foot elevated as something nasty bit me (and if I catch it, I will kill it!!!!) and because of the infection it left me with; I decided to get my circles/rings out and work on some more.

I could cut sitting down and also had my iron next to me, so was able to iron everything down.  On the right is a temporary display on my design wall of my 'rings'.

Decided to call them rings as they are not quite circles...if you know what I mean.  Now to get them sewn down before they fall off.

Check out Brenda's work by following the link above or the one here.

Wednesday, August 28, 2013

As promised

Before I went to the US - I showed some photos of the work done in Caroline Sharkey's class at Ballarat.
As promised I can now show you more photos of fabulous work completed in her class.
by Helen

2nd one by Helen

by Lyn
Aren't they fabulous.  Even though we were all in the same class everyone worked on a project that was different from the others.  This is because of the great tutoring by Caroline.

Friday, July 19, 2013

Fibre Arts Winter School

Last week I was lucky to attend the Fibre Arts Winter School at Ballarat in Vic. The concept of Winter School is you get to work with the tutor of your choice for one WHOLE week while living in at Ballarat Grammar School in the boarders lodgings.

The class I took was 'Painting the Landscape with Materials' with Caroline Sharkey.  One of the best things of all was I actually finished my project!!!!  How often do you attend a workshop or class and never finish the article - it then gets put away and often forgotten until one does a spring clean of one's workroom/studio.

The class, tutor, other students, organisation was all fantastic.  No pressure - work at our own pace, all meals provided (and they were delicious); lots of fun with the students in other classes, mixing with some famous tutors - Helen Godden, Linda Steele, Jenny Bowker, Karen Goetzinger (from Canada) and of course Caroline Sharkey.  ps I even had Helen Godden in my car one day.......


This is my finished piece of work - a 3D piece - something I've never done before.  But Caroline was so, so helpful and excellent in showing us how to interpret our pieces and how to work and improvise as well as showing us various techniques.  It was one of the best classes I have ever attended. It is my interpretation of the new growth in the forests around Anglesea after the devastating bushfires of Ash Wednesday.


During the week each class gets to sit at the 'Top Table' for the day - and provide some decorations for the table which are then auctioned at the end of the week with the proceeds going to Breast Cancer Research - these bottles were our contribution. ps - they are empty!!!


This is the table with ours and some of the other decorations of the previous classes.

Next posting I will show you some photos of the progress of how I worked on my piece.

Also I hope to have some photos of some of the work from the other classes - am just waiting to hear if it is OK if I post here.  Have heard back from one person, but not the others as yet.

I have already booked into the next School in April 2014 week in Ballarat.  The class I'm doing then is with Kim Thitchaki from England. She works with lots of mixed fibres and heat guns, soldering irons etc etc.

Tuesday, November 1, 2011

Memories of New York

I have just recently completed this little quilt in honour of my two visits to New York City (in 1999 and this year).  One of my most favourite places in the world to visit (haven't been to many, but love New York...)  I wanted to put something on my lounge room wall to remember this vibrant city.  Don't know if I will ever get back there.  Maybe one day.
I called it 'Postcard from New York.

Sunday, July 31, 2011

The best news.......


This weekend is the Melbourne Quilt & Craft Show at Jeff's Shed (Exhibition Centre).  I'm a member of my local Geelong Quilt Guild and also a little offshoot Art Play Group.  We only got together earlier this year to learn and try out new ideas in the Art Quilt area.  One of our group Lyn. thought it would be good to do a joint project and submit it for entry at the Show.  We did and not only was it accepted to be hung WE WON FIRST PRIZE in the Group Quilt Section.  How good is that!!!  I'm stoked!!

We made 12x12 inch quilts to the theme of 'circles'.  Mine is second from the right in the second row (bright pink background).  I used felt as the base and printed and discharged random circles then felted spirals and added some hand stitching and pearl buttons.

They were joined by using metal rings to continue the theme of circles and was named 'Circle Fabrication'.  I must thank Jenni S  of Jacaranda blog for these photos as I was not able to get to the show myself.   Her quilt is the first one in the second row.

Wednesday, July 20, 2011

Whoo Hoo - I'm back

on line, that is.
Have been having heaps of problems with Blogger.  Hopefully all is well again.

In the meantime I have been busy, busy, busy.  I'm participating in a Mystery Quilt through my Monday night group.  It is from the Bedford Mystery series.  This series of mystery quilts began in South Aust by a couple of quilters as a means of raising money for a local charity.  It is also the first Mystery quilt I've done and am enjoying it heaps.

Unfortunately, in my haste to get started I didn't take early photographs of the first three steps - there are 6 in all.  Step 1 was the selection of fabrics - I chose to do mine in 'country colours' - safe.... Step 2 was to make 4-patch blocks and strips with 1/2 sq triangle on the end. These blocks are some of the ones finished up to Step 3.

This next photo is Step 4.  These strips are the same construction as part of Steps 1-3, but are longer.  Hopefully the latter bits will be finished very soon. 

A bit hard to see on my 'design wall' as I have used a cream for the light colour material and my design wall is made from a cream flannel sheet.


In the meantime I have also finished some ATCs that are due to be posted very soon.

Thursday, December 16, 2010

I had forgotten about this one..

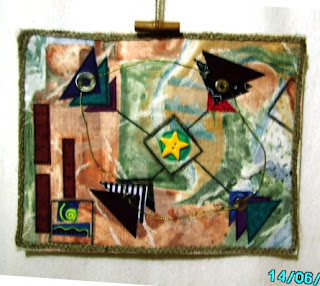
When searching through all my photo files on the computer looking for a specific photo of a specific quilt I came across this little one.  I had forgotten I made it. Duh.  It is a little 12"x10" quilt made for one the challenges for a little art group I used to belong to.  I have forgotten exactly what the theme was but looking at my notes (which I have kept with the quilt - wasn't that clever of me!!) it had to do with links or linking.
My background was a piece of furnishing material which is quite heavily stitched with different threads and gives it lovely texture.  I then overprinted with a simple edged square stamp (you can see one in the middle with the star button).  I then added three triangles in four blocks around the centre star to represent my three boys, and the fact that we had moved 4 times in our lives.  I couched some copper wire joining the triangles with each other and then towards the centre star which is the hub and centre of our world - our home.  I couched some woollen thread for the border and used a wooden toggle to hang it with.

On the left of the little quitlet are symbols representing where we have lived - in the hills just outside Melbourne with very very tall gum tress and then we came to Anglesea and the sea.

I thought this little quilt was lost when I had to pack up my sewing room towards the end of last year, for the painters to come in.  By the way, I still haven't found what I was looking for.....maybe it is in that 'safe place' we all have.!!

Bye for now, take care,
Joy

Sunday, December 5, 2010

A little bit of experimentation--

This weekend I did a little bit of experimentation.  I have dabbled a bit here and there with different surface elements and backgrounds for some time, but today decided to get the paints out.  In this first photo I originally started the painting in the top half when I spent some time with my friend Jeann.  Today I decided I needed to finish this piece, so added more yellow, then red and then purple.  I used acrylic paints mixed with a small dab of textile medium.  Quite like the way the colours have turned out, not sure what will happen next, but am thinking of using it as a background for a collage using sheers and tissue papers etc.

The following is what the experimentation was all about.  Reading through some of my many many books I found an article on 'sun printing'.  Today was the perfect day - plenty of Aussie sun, but not too hot as to dry the paint too quickly and little or no wind.  In this first photo you can see how I placed the leaves and anchored them down with small stones - they need to be as flat as possible so that they take more precisely.

The second shot is how it turned out.  The right side of the material I dampened first and then splashed over some acrylic paint diluted with medium.  The same mixture of paint was used on the left side, but I didn't dampen it before painting.  You can see the difference in the two backgrounds.  The dampened side is more even and lighter than the left.  Not sure which one I like best.  Should have used the same type of leaves on both sides then I could compare them better.  I'm learning and enjoying the process. 

Again not sure what will happen with this piece, but I'm thinking of cutting it in half and doing some free-motion stitching on one half and maybe collaging with the other half.  When it has dried completely and cured I may even add some more colour and definition to the leaves.

The whole process didn't take a lot of my time, just waiting for the sun to do it's bit.

Take care and enjoy the upcoming festivities.

Saturday, July 3, 2010

A small finish from Houston

 One of the highlights of my trip to the USA and Houston last year was meeting with Pokey Bolton of Quilting Arts fame and to be lucky enough to attend one of the Quilt-It Univeristy workshops.  The one I was able to get into was with Lesley Riley who developed the TAP product for using images in your quilts.
Here I am looking pleased with myself.

 It was  fascinating process and very easy.  The images come out so clear.  In our little kit we all received an image to use and some quotations along with the transfer paper, very clear instructions to use later, and iron-on webbing.

She had a humungous case of materials from which we could choose our background and any other bits we thought we might like to use.  In the workshop we managed to just finish doing the transfer and the iron-on bit.  The rest of the finishing was left to us to do later.  I had left mine as I wasn't sure as to how to finish it.  BUT I have been playing with a needle felting machine and having great time with it, that I want to needle felt anything that comes across my sewing table!!!

I got my little project out and did some free-motion stitching on the background thinking I might add some applique, but that felting machine was beckoning - so I searched my scraps of wool, found some I liked and felted some flowers onto the stitching. 

Did some round ones, long ones and a couple of leaves.  Rather like how it was looking, so rather than over do it I backed and edged my little quilt. For those interested it measures 10"x8.5".

Now onto more PHD's.  (I don't have UFOs!!!)

Wednesday, August 12, 2009

Using old laces etc


These postcards are made from an old piece of lace which I painted with dye to achieve the different looks. I made them up as one piece of fabric then I cut four pieces from the fabric and then edged them. The background is a multi-coloured piece of silk fabric which I fused to pelmet vilene to stiffen. I rather like the way they turned out. Kind of a triptych, but there are four instead of three!

A hint - I use a 'window' template the size of the postcard (6x4) or an ATC (2.5x3.5) to audition the part I wish to cut out. You get quite a different perspective when looking at it through the template. Just move it around until you see where you would like to cut.

Tuesday, June 30, 2009

Connections

I'm a member of Around the World in 20 Quilts - a small group of art quilters from Australia, US, UK and Europe who make a small art quilt 4 times a year to a chosen theme. Today 30 June is the final day for the unveiling of our quilts for this quarter. During the period between quilts we post little snippets as 'teasers' and it is very interesting and sometimes very surprising to see the finished quilt. You get an idea of what you think it might be, but when the final posting is shown quite often the quilt is not at all like you pictured it would be.


Some of us (myself included!) leave it to the last minute to finish off our quilts but we still get it done. The moderator of the group Linda keeps us on our toes.


This pic is of my quilt for this particular theme which was 'Connections'.
I worked on the connections between family and friends and the 4 sets of triangles represent my 3 sons and the 4th is for friends, with myself as the 'star' in the middle. I first tried a heart but it didn't work, probably because of the soft lines, whereas a star has harder lines and points which seemed to blend in more with the triangles. The three tiles on the left are for my boys again, but are aligned this way for DS2 who lives in northern Australia (Noosa Qld) and DS1 & DS2 who both live in southern Vic (Melb and Anglesea) and are also by the ocean (like myself) which the two smaller tiles next to them represent. I chose furnishing fabric for the background for the colours of the sand, the swirling of the ocean and green for the bush which surrounds me. I edged this little quilt with string and threaded it through a toggle at the top which 'binds everything together'.
I am quite pleased with how it turned out. I've been a traditional quilter for some 10 years now and I love doing these little quilties as it get me out of my comfort zone and I'm also learning heaps.