Please remember that any photos, images or text on this blog remain my property, but if you wish to use any that you see, feel free to contact me for permission. Thank you for respecting my request and enjoy your visit.......Joy

Friday, March 4, 2016

You Yangs (oops....)

Sorry everyone, I hastily posted earlier today without putting up new photos.  Sorry.

It is just two years ago (last week) that I moved from Anglesea on the Surf Coast to Lara, just outside of Geelong (about 1 hrs drive from Melbourne).

Here are two links to Parks Victoria for the You Yangs and Serendip Sanctuary which are part of the Lara area.  The You Yangs as you will see is a large rocky outcrop that rises out of the surrounding farmland.  Serendip Sanctuary is a bird and fauna sanctuary located at the base of this Rocky Outcrop.  The township of Lara has two small lake areas one is fed from Hovels Creek and the other is man made.  I actually live between these two areas.  The Melbourne/Geelong Highway (Princess Highway [A.1]) passes by the southern edge of the town.

As you can see from the above links it is a beautiful place to live.  I have gone from a 'sea-change' to a 'tree-change'.

Do you remember my 'blank' garden?  Check back to this posting and also this one to see some of the 'original' photos. The previous owner had mulched everything.  Here is what some of the photos now look like -
This is the corner of the back garden.
Natives plus some Geraniums.

Side garden showing my herbs - Sage, Lemon Thyme,
 Oregano and the big one behind Rosemary

The side wall at the back of the garage, near the outdoor table
 and chairs.
 Growing ferns, yukkas, and shade loving plants

My Stag Fern on the back wall between bathroom
 and toilet windows.


Monday, February 8, 2016

Circles/Rings, whatever you like to call them...

Some time last year I attended a workshop with Brenda Gael Smith (Serendipity Patchwork), a well known and award winning quilt artist.  The class was on template free cutting and sewing.

I was slightly nervous about this template free cutting thing - I like to be precise in what I am working on.  Brenda gave out her instructions with a practice pattern and material to go with it.  As I wasn't using my own material I thought - give it a go - no harm lost, no material wasted....

When we were finished with our practice blocks Brenda put them all up on a design wall - and guess what - they looked fabulous.  Everyone had slightly different material and we all cut our blocks differently yet they looked great when put together.

After a cuppa and some morning tea it was down to work.  We cut and cut and then worked with our background blocks and started to arrange our circles. I only had time to complete (but not sew down) about 6 blocks.  This last couple of days while sitting with my foot elevated as something nasty bit me (and if I catch it, I will kill it!!!!) and because of the infection it left me with; I decided to get my circles/rings out and work on some more.

I could cut sitting down and also had my iron next to me, so was able to iron everything down.  On the right is a temporary display on my design wall of my 'rings'.

Decided to call them rings as they are not quite circles...if you know what I mean.  Now to get them sewn down before they fall off.

Check out Brenda's work by following the link above or the one here.

Sunday, January 31, 2016

Postcard Exhibition at The Shrine of Remembrance, Melbourne

Last week my friend Jenni and myself visited the Shrine of Remembrance in Melbourne.  Jenni had discovered there was a Textile Postcard Exhibition held in the Visitor's Centre to commemorate the 100 years of the Gallipoli landing (Anzac Day 25 April 1916).

Textile Artists were invited to contribute a postcard within certain guidelines for this small exhibition.  You can find out more about the guidelines and the exhibition here in the link. It is well worth reading more about it.

In the meantime here are some of the cards we saw - there were 400 postcards submitted and they are displayed in two cabinets in the Visitor's Centre.  Not all are on display at the same time - the curators change the display every 5 weeks.  Consequently there are more than these few here.


Unfortunately, because they were displayed in a cabinet with glass top and the lighting was not conducive to taking photos they haven't turned out as well as I expected.

Also you can see the downlights in the roof reflecting on the glass.  Nothing one can do about that.

But I hope it gives you an idea of the content of the exhibition.

 We plan to go back in a couple of weeks when they have changed the display.

I found it quite poignant knowing some of the cards were obviously made in memory of a loved one lost.

Thank you Jenni for suggesting we see this.


Friday, January 22, 2016

Allietare - Finally a Finish..

After a few very very hot (40C+) days here in Lara, with high humidity on the cooler days, not a lot of sewing was done.  Actually not very much of anything was done!

But in the slightly cooler evenings I finished my Allietare top.  Not quilted and bound, but the top is finished.  I have decided not to do the wide border as Bonnie has, but just to keep a narrow border and then I will bind in the same black material.

When, at the beginning of this I didn't want to make the full size quilt, but a smaller version, I chose to make 3/4 of the numbers of each step.  Not knowing what the block/s would look like and also how the whole thing would come together, choosing 3/4 was a great choice in the end.

Only a couple of times did I have to add an extra one as 3/4 came out as an odd number.  But when putting the lot together as in Step 6 - I only had a few pieces and one complete block (the star block) left over.

Originally I thought about only doing half of the requirements, and then make extra blocks (if needed) at the end.  BUT I do not like doing this - generally I find I'm too lazy and want to get on to something else.  Would rather have some over than have to make extras.

So pleased making 3/4 turned out this way that next time (??) I will stick with 3/4!!

Thursday, January 14, 2016

Allietare Step 5 - nearly there...

After a scorcher of a day here yesterday (41C) and with the air con on full blast, I have finished sewing Step 5 and nearly all of the 'finale' or reveal and final step.  Hoorah!!  This is one quilt I have enjoyed working on.  Everything just seemed to go right and I love the choice of materials I am using.

Typical of Bonnie is her way of keeping things very very secret until you get to the final clues and the 'reveal'.  There are actually only two (different) blocks in this entire quilt, plus it is set on point.  AND would you believe the setting triangles are 'pieced'.  First time for this, for me that is.

So, after a mammoth sewing day today, I have now completed all the blocks, setting triangles and am ready to lay them out tonight.......


Remember that pile of 2" finished HST's from Step 1 and the 2" black squares - here they are - all joined into a 4-patch.


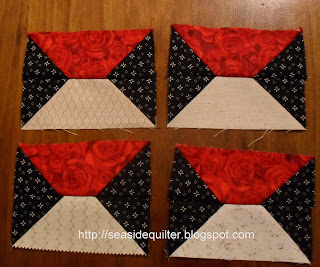
AND they are also here as the corner blocks in these squares - joined with the red and white trapezoids. All ready on my design wall to be sewn together.  Please no comments on the one that has one of its components upside down.....

I promise I won't sew it this way...

But wait there's more of these little devils to come......


Four of the above blocks sewn and pressed.  Loving the secondary pattern in the middle.... but we have to wait and see how they are used in the quilt.


This block uses the yellow/neutral 4-patches, plus the red/black bow-tie type block.  They also look good together on the wall.


Of course, a close-up of two finished blocks -


The final lot of those pesky triangles are used with those long neutral strips with a triangle in the corner, together with a red triangle for the 'setting triangles'.  (Note 3 triangles to make one...LOL)


The blocks are set alternately on-point.  After laying them out on my floor I can start sewing them together.

Then, I can have my 'reveal', hopefully this weekend.

Tuesday, January 5, 2016

Step 4 - Allietare

Step 4 was typical of Bonnie Hunter and her mysteries.  A lot of sewing, sorting and cutting.

We had to make 30 sets of four blocks.  Each set had to have the same red, the same black, but a variety of neutrals.  This is one set of 4.  They finish at 3.5" x 4.5"

When I finished this mammoth task I downloaded Step 5. Unfortunately NOT the reveal - there is still Step 6 to come..... This bit of sewing is only a small part of this step, but was all I could get done before going to Melbourne tomorrow.  We need 16 pairs of these.
When I return on Friday, hopefully will be able to proceed with the rest of this step.

Then it is on to Step 6 and the reveal!!!!!  Which is the instructions for putting all these pieces together.   

Friday, January 1, 2016

The New Year is upon us.....and a mystery is in the wings...

It crept up very quickly.....

Wishing everyone a safe, happy and healthy 2016.

After finishing off the grey quilt, I was itching to do something with a bit of colour.  I had decided early in the December that I would sew Bonnie Hunter's mystery this year.

Over the past couple of days with the heat we are having here in Victoria (some days of 35-40C) and with the air conditioning on I started on the mystery.  I am a little bit behind as the reveal and final steps will be posted later today.  But that's OK - I will only look at each step as I finish the previous one.

Here is what I have achieved so far - my materials sorted - blacks, reds, golds (although mine are more yellow/gold), neutrals and the one piece that is used throughout the mystery a grey.
 One of the reasons I decided to follow along on this journey is the colours that Bonnie chose to use. I know some people choose to use different combinations when making a mystery quilt, but generally I go along with what the designer suggests or what they have said they used.

This next photo shows the first step - a pile of 2" finished half square triangles using the grey and neutrals.  Typical of Bonnie's style - heaps of little sewing.....
 Step two the cutting and then the finished pieces sewn together.  In this step she introduced the red with the neutrals and the grey material.
 The finished sewing of step two.  I am only showing 4 blocks here so you can see more clearly how they look.  Besides the pile was too big and it kept falling over.....
These had to be sewn in groups of four - the same four pieces of red and the same four pieces of neutral, but each group of four to be different but the actual four to be the same.
 Lastly step three.  We used the gold with the neutrals and cut 2" squares and sewed them into a 4-patch block.  Very easy step.  So am wondering what step four will be like.  So far each step has been easy sewing.  I am sure step four will have a lot more in it.
Tomorrow I will look up the instructions and start cutting and sewing, while trying my best not to look at step 5 which is generally the reveal and final part of the sewing.  There has to be a lot more as so far it doesn't look like much.  The last couple of her mysteries I usually have a gazillion little piles of blocks.

Well, we will see and I will post in a couple of days when I have sewn step four.

Saturday, December 26, 2015

The 'Grey' Quilt was well received.....

I hope you all had a lovely Christmas with family and friends.  I didn't have the time to post before Christmas as I was busy trying to get this 'grey' quilt finished in time for Christmas Day.

Plus in the couple of weeks before Christmas I had the cataract in my left eye removed and even though my sight has greatly improved, putting the required drops in 4 times a day my eye was constantly blurry.

Well, at long last here it is - the "I only want grey thanks Mum"....  The photos shows it on the floor - I don't have a wall big enough to hang it. It turned out to be nearly a king size quilt, so even two sons over 6" couldn't hold it up properly without it dipping in the middle.
You can see how I quilted the flying geese by looking at the right hand side - that shows the quilting of the geese on the back.  It is reversable using a darker grey on the back, but the geese are the same - black, medium grey and very light grey.


The second photo shows the label on the 'dark' side.  I deliberately put it on the left side of the quilt so that if Warwick wants to use this side on his bed then the label would be on the side away from the door and not noticeable.

Personally I actually prefer the darker side. But unfortunately forgot to photograph that side - maybe later (if I get the chance to take it to Guild next month).


This last one shows the quilting.  I quilted in a 'grid' style resembling a tartan pattern.  He was very pleased to see I hadn't (in his words) "done my thing with the quilting"......

Sunday, November 15, 2015

Grey.....and grey....

Do you remember when........DS3 asked me if I would make him a quilt for his bed - naturally I said yes, what would you like.  He replied just blue and white squares, thanks mum and none of that fancy stuff on the top?

Well that quilt which you can read about here has been used and used and is now relegated to the spare room.

So....he has asked me if I would make him another.  Yes, I said.   When I asked what he would like this time the reply was 'just plain grey' thanks mum.  I suggested he buy two plain grey flat sheets and I would join them and he could put his doona in it!!!  "Oh, I really would love a quilt if that's OK."     Plain grey???  I then asked him to send me some photos or clippings from mags showing what he liked and I would work from that.  (ps he loves Ikea...)

Among some of the stuff he sent me he said he liked the one with a couple of 'arrows' on it. OK, says me - I will have a look and found the one with the 'arrows' - plain pale grey doona cover with - yes - 'flying geese' at the bottom!!!

Decision made - material brought and here is a little snippet -


Just to make this a little bit more interesting with a much nicer photo I have been busy sewing more hexagons into my 'hexagon star' quilt.  I love the way this is looking, still not sure how big I will go - probably not much more than this.  With the extra bits that need to make it square I think will be enough. It will finish at around 5' square.  I am itching to start a '60 deg' diamond next - The seven sisters' pattern.


Wednesday, October 7, 2015

Learning to Sew (especially when you ask nicely.....)

During the 4th term school holidays my granddaughter Jorja came for a sleepover.  I had a few things planned for us to do but she asked if she could 'learn to sew patchwork please Nanna, and could I sew on one of your machines?'

Naturally I said yes!  But being unprepared for this I wondered what we could do.  I got out my box of 2.5" inch squares and decided that sewing 4-patch units shouldn't be too hard.  Also as there isn't a lot of sewing not too boring either!  I let her choose how many we would make and also what pieces she wanted to sew with.  Surprisingly she came up with some good choices in contrast and colour, with a lot of thought of who she would give them to also.

 She sewed 8 units as you can see above.  The piece of purple is the colour of the felt I ironed on the back with double sided interfacing.  We decided that they were 'drink/mug coasters'. Both of us were very proud with her efforts.
After she saw the houses I have been sewing she asked if she sew one of those.  Again I let her chose the material, I cut it, and then she sewed them on a foundation.  Admitting that this was much 'harder' but she did finish it.  This one is going home to be placed in her 'Barbie' box of tricks.

I think she did extremely well and now it looks like I will have to have a project to work on ready for next time.

When she got home, mummy and daddy had a very long demonstration on how 'you sew patchwork'. She remembered all the little details, like sewing straight; lining up the seams, etc.